Step 1: Access the Templates Section
- Open Headcount from a laptop or desktop computer (a larger screen is recommended for this task)
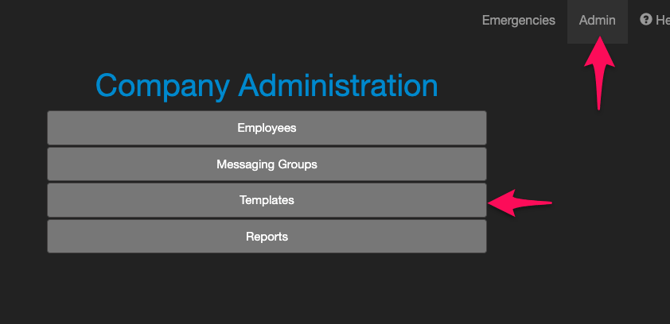
- Click on Admin located on the top right of the navigation menu
- Select Templates from the dropdown menu
Step 2: Navigate the Templates Interface
- View your existing emergency templates displayed on the screen
- Use the arrow on the left side of each template to expand and see the messaging templates for that emergency
- Note the Edit (pencil icon) and Delete (trash icon) on the right side of each template

Step 3: Understand Message Template Types
- Click the arrow on the left to expand an emergency template and see its message templates
- Start Message: The initial alert sent to everyone when an emergency begins
- Timed Message: Automated messages sent after a specified delay
- End Message: The "all clear" message sent when the emergency is over

Step 4: Edit Existing Message Templates
- Click the Edit button (pencil icon) on the right side the message template you want to modify

- Make your desired changes to the message text and keep in mind the purpose and context of each message:
- Start Message: help people evacuate safely
- Timed Message: help people mark themselves safe/in danger
- End Message: help people know it is safe to return to work
- Click Ok

- Click Save at the bottom right when finished

You can make multiple edits to all of your templates and click the save button once when you are done with all of your changes.
Step 5: Add Company Identifier to Messages
To help recipients know the message is not spam, add a company identifier to the beginning of the message templates.
The identifier can be the company name, site name, or an abbreviation of those.
It is important to choose an identifier that will be quickly recognized by most or all of your people.
For example: [Headcount] or [HC] or [HC LA] or [HC Main St]
- Click the Edit button (pencil) on the right side of the Start message template
- Add the company identifier to the beginning of the message.

- Click the OK button.
- Repeat for all messages as appropriate.
- Click the Save button at the bottom right of your screen to save the changes.

Step 6: Configure Timed Messages
- Click the Edit button (pencil) on the right of the Timed message template
- Set an appropriate time Delay for timed messages
- Set to a time at least the average time it takes to clear the building - you don't want people looking at their phone or marking themselves safe before they are actually safe

- Minimum time is 60 seconds
- 3 minutes = 180 seconds
- 4 minutes = 240 seconds
- 5 minutes = 300 seconds
- 6 minutes = 360 seconds
- 7 minutes = 420 seconds
- Set to a time at least the average time it takes to clear the building - you don't want people looking at their phone or marking themselves safe before they are actually safe
- Click OK
- Optional - if included in your subscription, you can configure multiple automatic timed messages
- For example, you can have one for 3 minutes (180s), 4 minutes (240s), and 5 minutes (300s)
- Click the +Message button
- Set the message type to Timed
- Set the Delay
- Set the Message
- Click OK
Timed messages will only be sent to people who haven't been marked safe yet
Step 7: Add New Emergency Templates
- Click the +Template button to add a emergency template (eg: "Tornado Drill")

- Give the emergency type a name.
- This name will appear inside of the app when you are setting up your emergency. So make sure it is concise and unique among all the other emergency types.
- Set the description of the emergency template.
- This is for other admins. If there are more details to help distinguish this from the others.
- Set the menu order.
- Lower numbers appear higher in the dropdown list. Higher numbers appear lower in the dropdown menu.
- This sets the order that they will appear inside of the app when you are selecting your emergency template.

- Click OK
- Edit the start and end message to add the appropriate messages.
- Click the plus message button to add a timed message if appropriate.
- Click the save button on the bottom right.
Step 8: Delete Outdated Templates
- Click the trash can icon next to a template you want to remove

- Click Save to permanently delete the emergency template.

- Click Cancel Changes to not delete it
Step 9: Best Practices
- Pre-configure templates so you don't need to create appropriate wording during an actual emergency
- Ensure timed messages are scheduled appropriately after everyone (most people) clear the building
- Review and update your templates seasonally / annually to ensure they remain relevant